You and I both know it would be a whole lot easier if we could just send you a disk with the Pocketcard digital files on it. However, that would cost something and take a whole bunch more time.
Instead, you have to put up with being a bit more of a computer user than you probably wished for. But hopefully, the following screenshots will give you a guide that makes the process a little less painful.
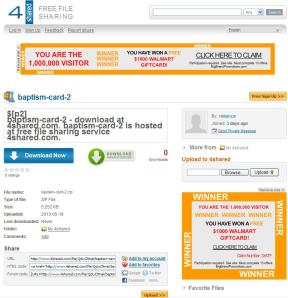
When you first click on the photo of the Pocketcard you want, you will get a screen that looks like the one to the left.
This is the home screen of the free-of-charge file storage website – 4Shared.com – that we chose to store the Pocketcard files.
Please note: You can click on the screenshots to the left to view a larger image of each one, if needed.
 2. After you click on the download link in the 1st screen, you’ll get a “thank you” message that looks something like the next screen to the left.
Ignore all of the flashing and other moving items that might distract your eyes from the line that says “Click here…”
Those are all ways that the good people at 4Shared make a living, by attempting to get your attention long enough to click on one of these other pieces of eye candy.
If you accidentally or unintentionally click on one, don’t worry – they are harmless for the most part, mainly there in hopes of 4Shared earning themselves a little online ad revenue from your click. Doesn’t cost you anything.
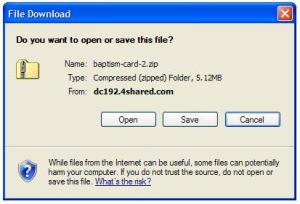
 3. After you click on the “…down load this file” line on the prior screen, you should get a dialog box somewhat like the one shown in the screen to the left.
Please note that we used Microsoft’s Internet Explorer for these screens; if you are using a different browser, like Mozilla’s Firefox or Apple’s Safari, your dialog box may look a little different.
In any case, we recommend that you select the option to “Save” the zip file, rather than “Open” it, so you have it for later.
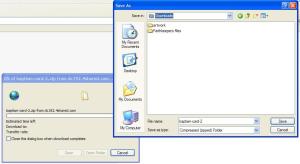
 4. When you choose to “Save” the Pocketcard file, you should get a couple of last dialog boxes that look like the ones in the screen to the left.
As you can see in the example, we already set up a sub-folder called “Faithkeeper files” in a main folder called “Downloads” where we chose to save all of the files we download for this example.
More than likely, you will have a differently named folder / sub-folder that appears as the default in this screen. You can save the file to whatever folder appears, select a different folder, or even set up a new one just for Faithkeepers files, like we did.
 5. In any case, after you have selected the location to store the zip file and saved it, the last thing you need to use the files is to “unzip” them.
To do this, you simply double-click on the file in the folder where you saved it and you should be presented a screen that looks like the one to the left.
What this shows you is the viewable and printable files that you downloaded for each respective Pocketcard. To actually save them as individual files, you need to click on the “Extract all files” link in the left-hand column with the blue background.
Success? We hope so… If not, and you run into problems, then do like I do and have one of your teenage daughters or sons (or your neighbors’ kids) do it for you! Good luck and happy printing!!

Pingback: Free Baptism Gifts: Going “Shareware” with Pocketcards « Faithkeeper's